To install metal landscape edging, first mark the desired area and dig a trench. Then, place the edging in the trench and secure it with stakes.
Metal landscape edging offers a clean, polished look for garden beds and pathways. It prevents grass and weeds from encroaching while maintaining a defined border. This durable and stylish option is easy to install and requires minimal maintenance. Proper installation ensures the edging remains stable and effective over time.
With a variety of styles and finishes available, metal edging can complement any landscape design. The process is straightforward, making it a popular choice for both DIY enthusiasts and professional landscapers.
Choosing The Right Metal Edging
Choosing the right metal edging is crucial for a beautiful landscape. The correct choice can enhance both appearance and function. This guide will help you make an informed decision.
Types Of Metal Edging
There are several types of metal edging available. Each type has its own benefits and drawbacks.
- Steel Edging: Durable and strong. Ideal for heavy-duty use.
- Aluminum Edging: Lightweight and rust-resistant. Easy to install.
- Cor-Ten Steel: Weather-resistant and develops a unique patina. Adds a rustic look.
- Galvanized Steel: Coated for rust resistance. Long-lasting and sturdy.
Factors To Consider
Before choosing metal edging, consider these important factors:
| Factor | Details |
|---|---|
| Purpose | Determine if you need edging for decoration or heavy-duty use. |
| Budget | Set a budget. Steel is generally more expensive than aluminum. |
| Climate | Consider weather resistance. Aluminum and galvanized steel resist rust. |
| Maintenance | Think about long-term care. Some metals need more upkeep. |
| Style | Choose a metal that matches your landscape’s look. |
By considering these factors, you can select the best metal edging for your needs.

Credit: landscapeimprove.com
Preparing Your Tools And Materials
Before you start installing metal landscape edging, gather your tools and materials. Proper preparation ensures a smooth installation process. This guide will help you collect everything you need.
Essential Tools
Having the right tools makes your job easier and quicker. Here’s a list of essential tools for installing metal landscape edging:
- Shovel or Spade: For digging the trench where the edging will go.
- Hammer or Rubber Mallet: To drive the stakes into the ground.
- Measuring Tape: Ensures accurate measurements for precise placement.
- Level: Keeps the edging straight and even.
- Gloves: Protects your hands from sharp edges and dirt.
- Safety Glasses: Shields your eyes from debris.
Additional Materials
Besides tools, you need other materials to complete the project. Below are the additional materials you’ll need:
- Metal Edging: Choose the type and length suitable for your garden.
- Stakes: These secure the metal edging in place.
- Sand or Gravel: Helps with leveling the trench if needed.
- Spray Paint: Marks the line where the edging will go.
Use the table below to check off your tools and materials:
| Item | Check |
|---|---|
| Shovel or Spade | |
| Hammer or Rubber Mallet | |
| Measuring Tape | |
| Level | |
| Gloves | |
| Safety Glasses | |
| Metal Edging | |
| Stakes | |
| Sand or Gravel | |
| Spray Paint |
Planning The Layout
Planning the layout is a crucial step before installing metal landscape edging. A well-thought-out plan ensures that your edging looks neat and professional. In this section, we will discuss the steps involved in planning your layout effectively.
Measuring The Area
Start by measuring the area where you want to install the metal landscape edging. Use a tape measure for accurate measurements.
- Measure the length and width of the area.
- Note down the measurements on paper.
- Make sure to measure any curves or corners.
Accurate measurements help you buy the right amount of edging material.
Marking The Boundaries
Next, mark the boundaries where the edging will be installed. Use a garden hose or string to outline the area.
- Lay the garden hose along the desired path.
- Adjust the hose to create smooth curves.
- Use stakes to hold the hose in place.
You can also use spray paint to mark the boundaries for straight lines.
Planning the layout ensures a successful installation of metal landscape edging. Follow these steps for a professional-looking garden edge.
Preparing The Ground
Preparing the ground is the first step for installing metal landscape edging. A well-prepared base ensures the edging lasts long. Follow these simple steps to get the best results.
Clearing The Area
Start by removing all debris from the area. This includes rocks, roots, and old plants.
Use a rake to gather loose materials. Dispose of them properly.
Ensure the area is clean and free from obstacles. This makes the installation easier.
Leveling The Surface
Once the area is clear, begin leveling the surface. Use a shovel to dig out any high spots.
Fill in low spots with soil. This creates a flat and even surface.
For large areas, consider using a long board to check the level. Place the board on the ground and use a level tool to ensure accuracy.
| Tools Needed | Purpose |
|---|---|
| Rake | Gather loose materials |
| Shovel | Level the ground |
| Level Tool | Ensure even surface |
After leveling, compact the soil. Use a tamper or your feet to press down the soil.
This creates a firm base for the metal edging.
Now, the ground is ready for the next steps in your installation process.
Cutting And Shaping The Edging
Cutting and shaping metal landscape edging is crucial for a neat finish. Accurate measurements and precise cuts ensure a professional look. Follow these steps to make your project easier.
Measuring For Cuts
First, measure the length of the area needing metal edging. Use a tape measure for accuracy. Write down the measurements on paper. This helps avoid mistakes.
Next, mark the metal edging for cuts. Use a permanent marker for clear marks. Measure twice to ensure accuracy. Incorrect measurements can waste materials.
Using A Metal Cutter
A metal cutter is essential for this task. Make sure you have the right tools. Use safety gloves and goggles for protection.
Position the metal cutter on the marked line. Apply steady pressure to make the cut. Avoid rushing to ensure a straight cut.
After cutting, check the edges. They should be smooth and even. Use a metal file to smooth any rough edges.

Credit: www.dakotatin.com
Installing The Edging
Installing metal landscape edging is a straightforward process. It helps in creating clean lines and defining garden beds or pathways. This guide will walk you through the steps to ensure a professional look.
Placing The Edging
First, lay out the metal edging along the desired area. Ensure the edges are straight or follow the curves you want.
- Use a garden hose to outline curves.
- For straight lines, use a string and stakes.
Next, dig a trench along the marked line. The trench should be deep enough to hold half the height of the metal edging.
Place the metal edging into the trench. Adjust it until it sits flat and even with the ground.
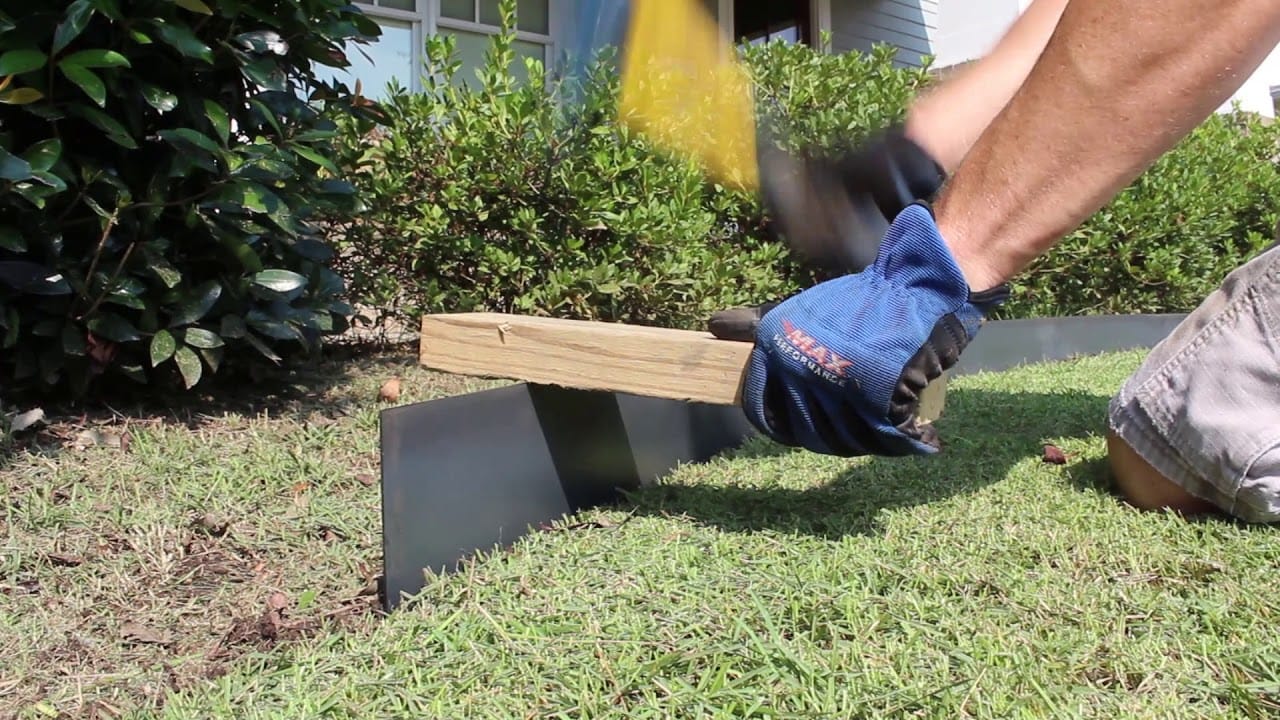
Securing With Stakes
Once the edging is in place, secure it with stakes. Insert stakes through the pre-drilled holes in the edging.
- Hammer the stakes until they are flush with the metal.
- Space the stakes 2-3 feet apart for stability.
After securing, backfill the trench with soil. Pack the soil firmly around the edging to ensure it stays in place.
Finally, check the edging for any adjustments. Make sure it is straight and level.
| Step | Action |
|---|---|
| 1 | Outline the area with a hose or string. |
| 2 | Dig a trench for the metal edging. |
| 3 | Place the edging into the trench. |
| 4 | Secure the edging with stakes. |
| 5 | Backfill the trench with soil. |
Metal landscape edging provides a neat and durable border for your garden. Follow these steps for a successful installation.
Finishing Touches
Completing your metal landscape edging project involves some finishing touches. These steps ensure your edging looks professional and lasts long. Pay attention to details for the best results.
Checking Alignment
Ensure the alignment of your metal landscape edging is straight and even. Use a level or a string line to check this. If the edging is not straight, adjust it until it is.
- Place a level on top of the edging.
- Check for any uneven spots.
- Adjust the edging as needed.
Double-check the corners and curves. They should match your design plan. Make small tweaks for perfect alignment.
Filling Gaps
After aligning, fill any gaps between the metal and the soil. This helps to secure the edging in place.
- Use soil or mulch to fill the gaps.
- Pack the material tightly against the edging.
- Ensure no gaps are left.
Filling gaps prevents weeds from growing through. It also keeps the edging stable.
| Step | Action |
|---|---|
| 1 | Align the metal edging. |
| 2 | Check with a level or string line. |
| 3 | Fill gaps with soil or mulch. |
These finishing touches ensure your metal landscape edging looks neat and lasts long. Pay attention to alignment and gaps for a professional finish.
Maintenance Tips
Keeping your metal landscape edging in top shape extends its life. Regular maintenance ensures your garden looks pristine year-round. Follow these simple tips to maintain your metal landscape edging effectively.
Preventing Rust
Rust is the biggest enemy of metal edging. Here are some steps to prevent it:
- Seal the edges: Apply a rust-resistant sealant. This adds an extra layer of protection.
- Remove debris: Regularly clean the edging. Leaves and dirt can trap moisture.
- Inspect for damage: Check for scratches or chips. These areas are prone to rust.
Seasonal Care
Each season brings different challenges. Here’s how to handle them:
| Season | Care Tips |
|---|---|
| Spring | Clean and inspect for winter damage. Apply a fresh coat of sealant. |
| Summer | Ensure no weeds are growing near the edging. Weeds can cause damage. |
| Fall | Clear fallen leaves and debris. This prevents moisture buildup. |
| Winter | Ensure the edging is free of snow and ice. This prevents rust. |
Regular maintenance keeps your metal landscape edging looking new. Follow these tips to enjoy a neat and tidy garden all year.

Credit: m.youtube.com
Frequently Asked Questions
How Do You Install Metal Border Edging?
To install metal border edging, mark your garden layout. Dig a trench along the marked line. Place the edging into the trench. Secure it with stakes. Backfill with soil for stability.
How Do You Keep Metal Edging In Place?
Secure metal edging by digging a trench, placing the edging, and backfilling with soil. Use stakes for extra stability.
How Deep Should Metal Landscape Edging Be?
Metal landscape edging should be installed 4-6 inches deep. This depth ensures stability and prevents shifting.
What Is The Best Way To Install Landscape Edging?
To install landscape edging, first outline the desired area. Dig a trench, place the edging, and secure it with stakes. Fill gaps with soil.
Conclusion
Installing metal landscape edging is a straightforward process. It enhances the beauty of any garden. Follow the steps outlined for a professional look. Proper installation ensures durability and low maintenance. Transform your outdoor space with this simple addition. Enjoy the clean, defined lines that metal edging provides.